Thursday, 19 May 2016

Ice Cream Tricycle Trailer


I got the idea to make this while working on a unit with our Junior Kindergarten kids about things that move. I brought my own kids to school on a weekend and we mucked about in the Makerspace and managed to put something together in an afternoon.

I pulled the tires off of a bicycle that I had found in the trash and cut a couple of circles on the router table out of some MDF. They are attached to the spokes of the wheels with zip ties. I drilled holes for some dowels and made a little hinged door. 


I built the frame from some pieces of recycled 1x4 from some old shipping crates and a 2x2 that I cut from a pallet. 


I drilled a hole in the end and drove a carriage bolt through it to make a hook to attach to the bike.


We filled a 64oz. protein powder container with ice and salt in alternating layers.


Then inserted a water bottle filled with cream, sugar and at the kids' request, some Milo.


Then we put it in the bike trailer and used a little duct tape to hold it in.


We hooked it onto the back of a tricycle on the playground and the kids took turns riding around churning the ice cream.


After 20 minutes, there was a thick layer of frost on the outside of the container.


It came out a little grainy, but frozen well-enough to call it ice cream.


It was pretty tasty and the kids enjoyed it.  The trailer was a bit rickety afterwards and a couple of the dowels came off while I was carrying it back to my room. 

.

For the next version, I will have to use thicker pieces of wood in place of those dowels. I'm also thinking to use a container for the ice cream mixture that isn't perfectly round so that it sloshes around a bit more as the drum rotates. This might make for slightly less grainy ice cream,

It was a fun project and if you give something like this a try, I would love to hear about it.

C:


Wednesday, 18 May 2016

Decoupage Cajon


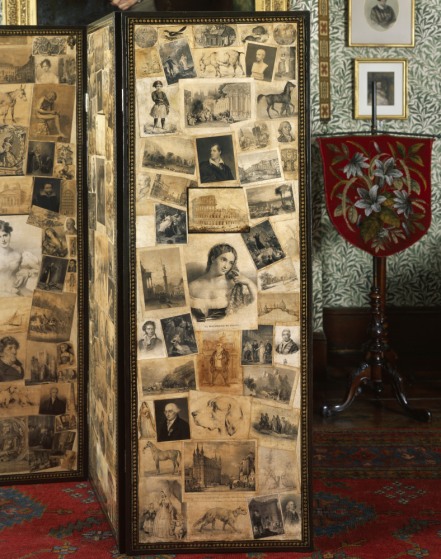
I picked up a bunch of old comic books for my kids at an outdoor market last year and when I found them a few months later with covers torn off and pages falling out, I thought they might make cool wallpaper or maybe covering some furniture. A little research uncovered the tradition of decoupage--decorating walls and furniture with coloured paper--that dates back hundreds of years. Some artists will create a collage of images, while others will create a single picture or design. On furniture, the paper is usually covered with a number of coats of varnish. There are fine examples in museums all over the world. This decoupage screen can be found at the Victoria & Albert Museum in London. 

While I was making cajon drums with grade 3 and 4 students (more on that in an upcoming post), we got an idea to try some decoupage on one of them see how it went. We found a recipe online that suggested mixing white PVA glue 1:1 with water, but this ended up soaking up the papers and causing it to buckle as it dried. We bought a few containers of Mod Podge and that worked better. 


One of our craftier teachers here suggested that I try using a spray adhesive first, to get the pages to stick, then use the Mod Podge overtop and that worked the best. Since the Mod Podge runs about 8 dollars for a single container, this also helped it go a bit further. I've worked with a few brands of spray adhesive this year and really like the 3M stuff. The other ones I used get gummy around the nozzle, but this one works great every time.


So here's how it came out:


I'm very happy with how they look and they have been able to handle kids sitting on them and beating on them without peeling. 

When our librarian saw them, she asked for us to do a couple of tables that she had in the library. The EdTech coach at our school runs a book club for boys, Books for Blokes, and they were keen to take up the challenge. We were thrilled to find a new way to help some reluctant readers develop a deeper connection with the library.


The Mod Podge provides a pretty thin protective layer that isn't really enough for heavy use, but it will protect the paper well enough that you can put a proper varnish overtop without discolouring or damaging the paper underneath.

This was a great project that the kids really enjoyed. And as far as educational outcomes go, the Marvel vs. DC arguments certainly justified the time that went into it.


Sunday, 8 May 2016

Light Painting with PreK


We have been having fun with light painting for a unit our PreK students (3 years old) have been doing about light and shadow.  First, we took some corrugated cardboard and covered the windows of the multi-purpose room to black it out. (White velcro tabs in the corners worked fine and you can barely see them when you take the cardboard down.)


I had some kids from our Makers Club help me set up a DSLR (Nikon D3200) on a tripod and do some experimenting with the settings. We settled on 3-second exposures with the aperture set to F8.


I found these great little LED lights that fit on the ends of your fingers and for the first session with the little ones, we just messed around to see how it worked.


I was actually planning to move on to some new learning engagements with this class but this went so well that we decided to keep going and dig a little deeper. In class, the teachers had the students practice drawing shapes and numbers in the air with their fingers so that when they came back to me they were pretty good at it. Here's how some of the better ones came out (I flipped the pictures on the computer--much easier than getting the children to write backwards...) :


Having a remote control for the camera made this a lot easier. I was able to assign someone to turn the lights on and off and someone else to take the photos.

The next step is to try to calibrate my printer so I can print a few of these out really nicely...

Tuesday, 15 March 2016

3D Printer: Flashforge Dreamer

I've had a lot of visitors this year coming by looking for ideas and inspiration for setting up makerspaces at their own schools. The big issues are usually about how to maximize space and how to get the most out of a limited budget. I thought it might be helpful to start blogging about the stuff that I have in my room and talk a bit about how I have been using it. I hope to get a new post up every couple of days. Each time, I will try to feature a new piece of equipment.

Today, i will kick things off with my 3D printers. I have two Flashforge Dreamers. I bought them from Simplifi3D in Singapore. They have been great. Nearly bulletproof. I haven't had to service them at all. I have had consistently good prints with both PLA and ABS. The machine comes with two extruder heads, but I rarely use both extruders at the same time. Instead, I just keep a different colour in each one so students have a choice. I like that the machines are enclosed so that little fingers don't end up where they shouldn't. The software is easy to use (almost a clone of the Makerbot software, indeed the machine itself is based on the Replicator 2) and i have had no trouble teaching it to other teachers and to students. For those people thinking about investing in a 3D printer, this is essential. You could spend hours and hours printing other people's stuff, checking their models etc... so you really need to train up some people quickly. 3D printers are slow. These are no exception. If you want to run a 3D modelling unit with an entire class, give yourself a week to get all of their models printed. If you do a whole grade level, you can't possibly print one for every kid. 


Right now, I am working with a grade one class. We are designing cookie cutters. they are using a great online tool (free) called Cookiecaster and even for grade one, it's a piece of cake. There is a short tutorial and after the kids did that. they were up and away. In a single lesson, they all managed to make something decent. I had them in pairs and groups of three.

Since it's the Year of the Monkey, there is a monkey-shaped cookie cutter on the left. The middle one is the Chinese character for Spring (chun). The one on the right is a brain.TinkerCAD is another online program for creating printable 3D models and it's really easy to use. Grade 2 kids used it to create custom nametags and it took no time at all to teach them to use it.  Earlier this year, I did some architectural design stuff with grade 5 kids using SketchUp and their buildings printed pretty well. As an educator, you can request an upgrade to the pro version which makes it really easy to export your files in .stl format, which is the format used in 3D printing.If you only have handhelds, Autodesk has a 3D sculpting program called 123D Sculpt that is really easy to use. The new version, 123D Scuplt+ is not nearly as easy to use, so I recommend grabbing the previous version from the app store while it's still available.The machine that you choose does make a big difference. The first machine I got was from a startup and the machine was called Makibox. The machine was a complete disaster and the company went out of business shortly after I received it. It's now a $300 paperweight. At the other end of the spectrum, we also bought 3 5th generation Makerbots that were also a disaster. They all failed and since the design of the machine is all proprietary, you can only get parts from the manufacturer and almost any attempt to fix the machine yourself will void that warrantee (including using plastic filament made by anyone else!) Those machines are now $5000 paperweights. So it's important to do your research. make sure you buy something with local support. Buy something based on open source hardware so you can easily replace parts.Or, check out the Reprap and try your hand at building one of your own. Using the parts from my dead Makibox, that's my next project. I will be sure to post my progress once I get started. In the meantime, I would love to hear about your 3D printing experiences in the comments. 
 

Monday, 14 March 2016

Pizza Box Foosball


This year, the Association for Persons with Special Needs (APSN) organized a walkathon fundraiser during the Chinese Lantern Festival. Each walker was given a goodie-bag that included a paper lantern on a stick that people could carry during the walk (they wanted to set a world record for the largest-ever lantern walk...) Due to haze, a lot of people didn't show up, so they were left with nearly a thousand goodie bags. Since our school played a big part in helping organize the event, we were left with the remaining goodie bags and I was lucky enough to inherit a ton of wooden dowels.

My own kids are into foosball these days, after playing on one at a pizza place we ate at. It wasn't much of a leap to put these things together and make a pizza box foosball game with the addition a few clothes-pegs and some rubber bands.  Once they are finished with it, this will serve as a nice prototype for my students. It works OK, but there are definitely some things that could be improved. It will be interesting to see what they come up with to make it better.


Once you start collecting stuff, and people know you collecting stuff, things start to come to you. I was at the walkathon and started pulling discarded dowels out of the trash at the end  of the evening. I managed to scoop a dozen or so. But the next day, I found that huge bag waiting outside of my classroom with a lovely note saying, "Hi Ben. When we ended up with these, of course I thought of you!" 

Sweet...

Saturday, 12 March 2016

Maker Educators Symposium and Workshops

On Friday, the Singapore Makers Association hosted a symposium for educators. The panel discussion to start the day was a good opportunity to learn more about the state of maker education around Singapore. It was interesting to note the differing perspectives on the subject. In particular, I was struck by how many of the attendees from international schools see the so-called "Maker Movement" as an empty, meaningless term asking, "What's so new about making things? and ,"Did people ever stop making things?" 

On the flipside, a number of of people from Singapore and SE Asia insisted that, at least for them, this is indeed new. Many people here will go their entire lives without getting anywhere near a tool and the idea of fixing something or making something yourself is entirely foreign. For Singapore especially, there is a real stigma against working with your hands--that it's seen as low-brow, blue collar etc... For a woman to take an interest is even more unusual and culturally discouraged. So it was exciting to see such a great turnout of people genuinely interested in helping usher in a new era for maker culture.

The afternoon was filled with workshops on a whole range of topics. The first one that I did was about how to make circuit tiles as a way of introducing kids to electronics. They are easy to make and I think, in many ways, a better teaching tool than more ready-made equipment. Although I'm a big fan of Snap Circuits and Littlebits, and for sure, those tools offer a lot more options, these tiles are very straightforward and it's really easy for kids to get their heads around the flow of electricity and how each component works. And they are cheap enough to make that you can afford to let kids really mess around with them. It's no big deal to replace components if something burns out, unlike some more expensive products.


The next workshop was a fun one that was meant as a team-building activity that would also introduce participants to the parts of a bicycle and how they work. We were put in groups of five. Three people were 'mechanics' an two were 'engineers'. On the floor was a range of bike parts and tools. The mechanics were blindfolded and had to follow the instructions provided by the engineers to put the bikes back together. 


I don't know how many of my students could do this without the blindfolds, but I have a few old bikes that I pulled out of the trash so one of these days I will give it a shot and post back with how it went.

This was a great event and I'm pleased to see these guys taking a leadership role in promoting Maker Education in Singapore. This year, we have been running monthly meetups for maker-educators that includes a lot of the same people. So if you were unable to make it but want to tap into this growing community, drop me a line, or check on the SingaporeMakers website to add your name to the mailing list so you can keep up with those meetings. We try to visit a different school each month. 

Friday, 4 March 2016

FLL Singapore 2016


It's our second day of Robotics competition at this year's FLL and it seemed like as good a time as any to get back to some regular blogging...

 Once again, the organisation of the event has been excellent and the folks at Duck Learning and my colleagues over at our Lakeside campus deserve a round of applause for pulling this off. There are over 1000 kids here, on teams from Hong Kong, China, Vietnam, Cambodia and Singapore and things have gone really smoothly. 

The two teams from TK that we put in this year are young--from grade 3 to grade 6. All of my kids from last year moved on any I had to start again from scratch. This year I decided to start with younger kids so that they can grow with the program and we can try to develop a bit of a legacy that will carry on. They have struggled a bit today ("This table is different...", "the obstacles aren't in exactly the same place...") but the kids are still in good spirits and when I asked them, they were all very keen to continue with this even after the competition. There are a few other schools interested in a smaller-scale 'friendly' competition in a month or so, to give the kids another chance.

At first, I was not big on the idea of adding the LEGO EV3's to our program. They seemed to me to be expensive and limited and I was more interested in working with Arduinos and motor shields, with wires sticking out here and there and kids having access to the real guts of the thing. But so far, I've had a really positive experience--particularly with the FLL. The kids have been really motivated and very independent. There are so many free resources available, they can really teach themselves a great deal with only gentle guidance from an adult.

For a more teacher-guided approach, EV3lessons.com is a great site. It includes a ton of short, downloadable lessons that you can print as a series of pamphlets. Each one teaches a specific method (.e. Basic Line Follower) and includes a simple challenge that they complete on their own (i.e. Your robot must move to location X, pick up object Y and it back to the starting point.)

Another great site is LEGOenginnering.com which includes a ton of cool project ideas for teachers and students. There is stuff here for those with NXT, RCX and WeDo kits as well.  There are also plenty of projects that encourage kids to go beyond their lego kits with found materials or other programming languages like Scratch.

A few years ago, I did a LEGO Teacher Academy training workshop where we were briefly introduced to some of the data-logging features of the EV3. This is an area where there still hasn't been much published on how people are integrating this into the classroom, it seems to be an area with amazing potential. It is like a whole science lab in a box. I came across this prezi presentation that introduces how it works and there are a multitude of additional 3rd party sensors available such as hygrometers, infra-red sensors and more.

Our lunch is almost finished, so I need to get back and see how we do in our third round. Wish us luck!

C:

** update

One of our teams were runners-up for best-researched presentation. Awesome! This just goes to show how incredibly motivating this can be. Not only were our kids among the youngest in the competition, but most of the kids on our team are not particularly big on academics. But this was all theirs. With no one forcing them to do any of it, these kids spent hours researching and practicing their presentation. Here's the result:

Iconic Design: Bic Pen

  I bet we all have one or two of these. Learn the story of this perfectly designed product. (I question his argument that the pen caused an...