Monday 22 November 2021

Student Hardware Reviews: Aufero Laser 1 Engraving Machine

 After our very positive experience with the X,Y Plotter that Uunatek sent us, they kindly shipped us another product for review. This time, it was the Aufero Laser 1 Engraving Machine. Below is the review written by Alisa, a grade 6 student, who took on the responsibility of putting it together:


Assembly

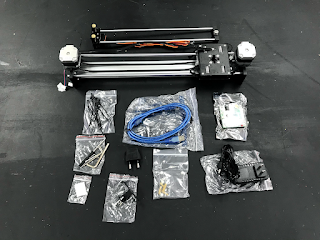
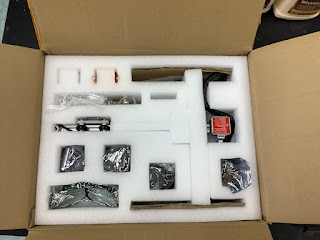
When we received the robot, it was carefully packaged with layers of foam on the inside. This is what you will find after opening the box. It also included a paper with links. One of them shows you how to assemble the robot, the other is a software guide.


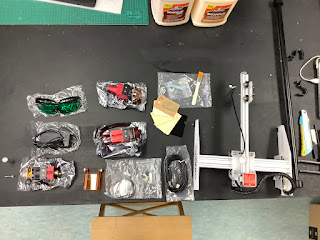
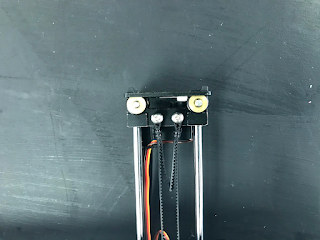
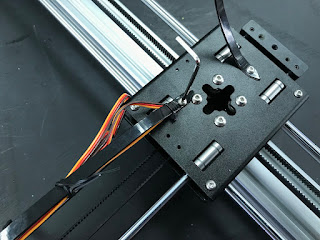
The main body of the laser was already built for us, and I only had to tighten a few screws and attach a laser on the side. There are 3 different types of  lasers that came with the laser, depending on whether you want to engrave or cut. This could be very useful since people will probably want to do both.


To connect the robot to a computer, we started with a Macbook Pro. Like the plotter, this machine does not support mobile devices. We had to download a program called Lightburn. It costs $60 but we used a free trial.  My teacher and I tried and tried but we never got it to work. The computer could not recognise the laser. We tried on two different computers. 

Next, we tried Lightburn on Windows. We didn't get that to work either. But there is another program for Windows that did work and the best thing about it is that it's free. It is called LaserGRBL.  It only works on Windows. 

The process of getting the laser to work seemed somewhat complicated. The software was not very intuitive. It took me a while to understand how to make it move. But after some playing around, I was able to understand how to use it.

Unfortunately, I was never able to use the laser. This is a diode laser and is ranked a class 4 laser. It can be dangerous to use and can permanently damage your eyes just by looking at it.  We decided that this part of the process should be done by an adult.  (Thankfully, we have another laser in the class that is safe for use with kids, so I can use that one...) The company does include special glasses and  a coloured shield around the laser to protect your eyes. With this in mind, We think that this machine would be a great tool for adult hobbyist who knows what they are doing and understands the risks. It is very affordable and works right out of the box. With a little time and patience, you can figure out the software.   

This machine is NOT SAFE for use in schools or near children. There is too much chance that they will look at the beam and injure their eyes. Since the machine is open, it is also possible to get a burn. 

As I said above, this is a Class 4 laser. In some countries, you need a license to use it. For example, here is what it says on the NEA (National Environment Agency) in Singapore:

"Class 4 lasers are high-power and high-risk lasers that are capable of emitting ultraviolet, infrared or visible laser radiation at levels exceeding the accessible emission levels for Class 3b. Typically, these lasers have power output of 500 mW or greater. These lasers can produce a hazardous direct beam or specularly reflected laser beam that can injury the eye immediately (and permanently). They may also burn the skin and/or cut the flesh."

You can check their website  if you want to know more about different kinds of lasers. We found it very helpful. 

If you want to see some video reviews of people using the Aufero Laser, this video and this one show it in action. 


Wednesday 6 October 2021

Student Hardware Reviews: iDraw XY Plotter


Recently, a company called UUNATEK reached out to me to ask for a review of their iDraw Pen Plotter. This happens from time to time and I am always excited when I can give students an opportunity to beta test or review a product and see that their opinions matter and can hold sway in the "real world". These sorts of partnerships can also make a big difference for schools running STEAM on a limited budget and you may be surprised how much free stuff you can get for your classroom just by sending an email and asking.

The iDraw is not the first plotter that I have had here in the STEAMlab. I bought a Makeblock XY Plotter years ago to do some laser engraving and while that one doesn't get a lot of use, this one got my students really excited. Over the course of a few recesses and lunches, three grade six volunteers put it together and ran it through its paces. With practically no help from me, they managed to get it up and running and did some pretty cool stuff with it. 

Once I've had some time with it myself, I will post my own thoughts on the iDraw. For now, I want to share the thoughts of the three grade six girls who have been giving up their time to come in to the lab and build this robot for me.


Reviewing the iDraw Pen Plotter

by Stella, Yu-Hsuan and Alisa

Assembly

When we received iDraw, it was carefully wrapped in plastic, and it was easy to open.


This is what we got when we finished unwrapping it.


We connected the two parts for the X and Y axis.


After that, we had to screw in two tiny black screws. It was a little bit challenging, since the two poles kept moving and were somewhat oily.


Next, we attached two belts on the y-axis. This part was very difficult for us. The belts are very tight, which makes the screws hard to screw in, so you might need the help from another person.


Then we screwed in the screws connected to the wires.


We connected the transparent plate to the plotter using plastic screws and golden connectors.


Then we added the microchip on top of the transparent plate, this time using metal screws connected to the plastic ones.


We plugged in the cables in the appropriate slots. We plugged the bottom left plug incorrectly, and that resulted in the plotter not being able to go up and down while drawing, but once we realized, we fixed it quickly by turning the plug around, and the plotter worked perfectly after that.


We then paste the four transparent protection stickers on the four corners below the plotter. Then we were done!


Our Opinion


    After we finished assembling it, we had to connect it to a program called “Inkscape”. None of us had experience with Inkscape or any of these kinds of software, so it wasn’t easy. For those who are familiar with Inkscape, it will be a piece of cake.

    After we figured out how to program it, we wanted to see it draw. So we started off with making simple shapes, and then made the plotter write words, and the plotter worked perfectly! We had to adjust the home position of the plotter every now and then, but besides that, it was fun to watch it draw.

    We recommend this product to schools and teachers, and those who want to learn more about plotters like this one. Unfortunately you are only able to control it from a computer. So for kids who don’t own one, they wouldn’t be able to control the plotter. We think that it would be better to design it so you can control it from an iPad too.
    We figured out later that it’s best to tape down the paper before the plotter draws on it, since the paper will keep sliding around, the plotter won't be able to draw properly and you will end up with a weird drawing than what you initially wanted.
    In conclusion, building the plotter was easier than we thought it would be, but it would be best if it came with an instruction manual. We were able to build this because we found the instructions on the company's website. We had a lot of fun building it and our only suggestions are to design the plotter so you can control it with an iPad, since not everyone, especially kids, own a computer, and please have an instruction manual next time that goes with the plotter. Overall it was a fun experience building and making this iDraw plotter draw, and we kept wondering how it draws so perfectly.


Wednesday 29 September 2021

A dad's return to D&D and the best resources I found along the way


As it has for so many others it seems, the last couple of years have created the perfect storm to get back into Dungeons & Dragons after so many years. Stuck at home, trying to find ways to keep the family entertained without constantly staring at screens, we found ourselves playing a ton of board games and one thing led to another... 

The kids started asking about it when we watched the first episode of Stranger Things together and I was able to regale them with tales of AD&D Adventure from when I was young. We discovered Critical Role (a group of voice actors who started sharing their games on YouTube in 2012 and have now become an institution with half a million viewers each week and their own books) and so many others sharing their gameplay online and it didn't take much coaxing after that to get them to give it a try.

We started with the D&D Essentials Kit and I'm glad we did. it included everything we needed to get started and instead of more traditional story modules that can take weeks or months to complete, this set is based around shorter one-shot adventures. This worked well for us for a couple of reasons. For the Dungeon Master, preparation was a lot simpler. Each session would only take an hour or two and I didn't need hours and hours to get everything ready. Also, our kids' friends have busy lives. D&D would have to compete with one kid's soccer, another kid's swimming lessons and so on. By playing a series of shorter adventures, it was a lot easier to play with a different group of kids each time. If someone missed a session, it was no big deal. The other option would have been the D&D Starter Set which includes as more traditional module that by all accounts would take about five 3-4 hour sessions to complete. In fact, now that we have established a core group of kids that show up pretty consistently, we will likely switch to longer-form adventures but it would have been tricky if we had started with that.

The best resource that I found to get things going was a YouTube channel called Bob World Builder. He is a supremely like-able character who offers helpful advice for setting up and running your games with the emphasis on making sure that the players have a good time. He created a series of videos specifically for the D&D Essentials Kit. For each adventure in the kit, there is one DM Guide to help a Dungeon Master prepare, then a second play-through video so you can get a sense of how it might go. These videos were invaluable not only to help me relearn how to run a game but they also made me feel like I could do it. Even as a person who grew up on D&D, getting started felt overwhelming before I discovered Bob.

The folks at Critical Role created a series of cute video shorts called Handbooker Helper to get people up and running. They were definitely useful and I come back to some of them from time to time if I need a quick refresher on something. But for something more comprehensive, I really got a lot out of a series called How to Play Dungeons and Dragons 5e on a channel called "Don't Stop Thinking". These animated videos take their time and show you exactly how to do all of the things you need to do (i.e. how to roll for initiative to determine turn order during combat or how to do saving throws to determine if a player or creature will succumb to a magic spell.) He gives detailed examples so you can walk away from the video quite confident that you will know what to do during your game.

Since we already had the set, we encouraged my son's friends to download the rules. Wizards of the Coast have made the basic rule book available as a free download. For most people, this is all you will need. There are more advanced rule sets available in the form of the Player's Handbook, Dungeon Master's Guide, Monster Manual and more but after a few months of playing with our current group of kids we have not seen a need to go beyond the basic rules. We did get a set of dice as a welcome gift for each of the kids that has joined us but everything else has been on the cheap and we have done just fine.

As far as story modules go, we have mostly stuck with one-shot adventures. We jumped out of the Essentials Kit for a while and played through a series that we downloaded for free called Defiance in Phlan. This includes five short adventures that were designed to introduce new players to the game and were intended to be run in an hour or less at shops that sell other D&D resources. Each of these seems to have just the right balance of mystery, role-play, combat and the group really enjoyed playing them. Since each one was a stand-alone adventure, after running the first 3 sessions, I was able to pass on Dungeon Master duties to the kids. The stories were short enough and simple enough that these 11 year old kids were able to run them with minimal support from me.

One other resource that I want to shout out is actually another role-playing game called Hero Kids. This was not my first attempt to get my kids into RPG's. Our first try was with this game. For the most part, it is a very simplified version of D&D that is aimed at younger players. The players take on the role of child adventurers and the violent aspects of the game are de-emphasized. Most monsters will be defeated and run away rather than die slowly in a pool of their own blood... The stories are very well written and give lots of great detail. The game mechanics are simplified enough to make it easy for anyone to get their head around them and they don't require any special equipment to play. You just need to print out a few pages and have some 6-sided dice. 

Recently, we have adapted some of these adventures for D&D and they have been a ton of fun to play. 

The final resource that I want to talk about it Roll20. In case you are not run a group game in person, Roll20 offers a whole toolbox to make it easy to run games online and play remotely. These sorts of games do require a bit more preparation, but the few sessions that we tried online went well. It has build in audio and video communication and a digital whiteboard for sharing maps and moving tokens around to represent players' movements. You can create characters right there and upload any content you like. there is a ton of premium content on there as well that is available for purchase but even a free account is plenty for those who are just getting started.

I hope that people find some of this helpful. Even as someone who grew up on D&D, getting back into it seemed a bit intimidating at the start. I'm grateful for these content creators who made it a lot easier. It has been a great experience for us and our games have been a weekly highlight for all of us. 


Digging deeper into pop-up tents

  This video, "Pop-up tents are weirder than you think" explores the mechanisms of the bands that fold and twist to open and close...